
 Latest images

Originally posted on the CW Forum - I just had to share it.
Hello All - Owl Project
Just for fun the owl has a towel hanger that is attached to a slide and is wired to the wings so that they flap up and down.
Started 11:00AM, carve was 2 hours @ Normal, both sides and vector cut with 1/16” carve bit, in re saw Cedar with a framed carrier and cut out on the band saw ¼” blade. Some other parts were made separate.
1) The top, back, hanger and spacer was traced and cut on band saw.
2) The slide, I cut the beveled edges first to fit back side slot and then cut the depth with a slight taper to give the wire tie room to work, Band saw.
3) The bottom slide guide, Is three parts, one rectangle and two top guides were cut from the left over slide, and used the band saw to give it shape.
4) Belt sanded wings to about ½”.

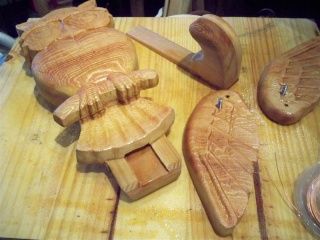
Some sanding and glued it up, drilled the holes for hardware in the wings, I put markers in the pattern for location, I gave the glue up about two hours clamped used tite bond 3, next did some Dremel clean up sanded edges with a 4” round orbiter, sprayed on some clear lacquer – 5:00PM. For me that’s fun.
Well here it is if you want, The MPC is over 2 meg so I put it into three MPC files.
First open “OwlBuild01slice” next open ”OwlBuild01slice2” and open carving list, right click the group and select all, right click again and copy, next click on the “OwlBuild01slice” tab, right click on the board and select paste this should place the group onto the board where I had it original. Now open “OwlBuildWingsHangers” and repeat above procedure. Now it is all on the same board.
Note, the back side carve slot is on all three MPC files make sure it lines up - see “OwlBuild01slice 2” for how it should be.
Also fell free to change and crate your own version of the project.
Hope you enjoy and want to thank every one ho has given their great projects, pixs, and learning tools, paid for and free they are all good.


Cheers and good day ~ Ray Ver. 1.152 and working great.
MPC File: http://www.mediafire.com/file/3yztjghmtjy/the whole owl.mpc
Hello All - Owl Project
Just for fun the owl has a towel hanger that is attached to a slide and is wired to the wings so that they flap up and down.
Started 11:00AM, carve was 2 hours @ Normal, both sides and vector cut with 1/16” carve bit, in re saw Cedar with a framed carrier and cut out on the band saw ¼” blade. Some other parts were made separate.
1) The top, back, hanger and spacer was traced and cut on band saw.
2) The slide, I cut the beveled edges first to fit back side slot and then cut the depth with a slight taper to give the wire tie room to work, Band saw.
3) The bottom slide guide, Is three parts, one rectangle and two top guides were cut from the left over slide, and used the band saw to give it shape.
4) Belt sanded wings to about ½”.
Some sanding and glued it up, drilled the holes for hardware in the wings, I put markers in the pattern for location, I gave the glue up about two hours clamped used tite bond 3, next did some Dremel clean up sanded edges with a 4” round orbiter, sprayed on some clear lacquer – 5:00PM. For me that’s fun.
Well here it is if you want, The MPC is over 2 meg so I put it into three MPC files.
First open “OwlBuild01slice” next open ”OwlBuild01slice2” and open carving list, right click the group and select all, right click again and copy, next click on the “OwlBuild01slice” tab, right click on the board and select paste this should place the group onto the board where I had it original. Now open “OwlBuildWingsHangers” and repeat above procedure. Now it is all on the same board.
Note, the back side carve slot is on all three MPC files make sure it lines up - see “OwlBuild01slice 2” for how it should be.
Also fell free to change and crate your own version of the project.
Hope you enjoy and want to thank every one ho has given their great projects, pixs, and learning tools, paid for and free they are all good.
Cheers and good day ~ Ray Ver. 1.152 and working great.
MPC File: http://www.mediafire.com/file/3yztjghmtjy/the whole owl.mpc


 Wed Feb 04, 2015 4:02 pm by Ken Schwendinger