
 Latest images

Ok, as I stated before I have had the CW for about a year or so and I just got into the double digit hours for carve time. Here is what happened:
I purchased the CW and carved 1 test item.... just to see the machine work. Something small, no big deal.
After playing with the software and getting a design that I really liked, I got everything loaded up into the machine a proceeded to carve. During this carve I received one "Z Axis stall" error message. I reset the job (about 25% complete) and restarted the machine. No more problems...
My 3rd carve was to be the same item as before, I wanted to see design repeatability on different types of wood, the first piece was pine, this was to be red oak. I got everything loaded up and started the carve. This time all hell broke loose: The machine jammed the bit to the hilt into the wood, almost dead center of the piece, and started cutting at darn near warp speed (through 1.5 inch red oak) along the Y axis. The bit broke and smoke was coming from the machine. I cleaned everything up, let her cool, checked the design again, got another piece of wood and started over again.
This time it was error after error, all of them Z Axis stall. So I closed up shop for a while. I never got around to sending it in for warranty repair, life has a way of distracting you sometimes. So here I am, brand new workshop $2k on a machine, its out of warranty, and broke... time to break out the duct tape.
I found the manual on the CW site on how to remove the "Z Pack" and followed the instructions. I figured the best place to start was there since it was the culprit for all the errors. As I started to work, I found that I could not turn the 2 cammed screws.
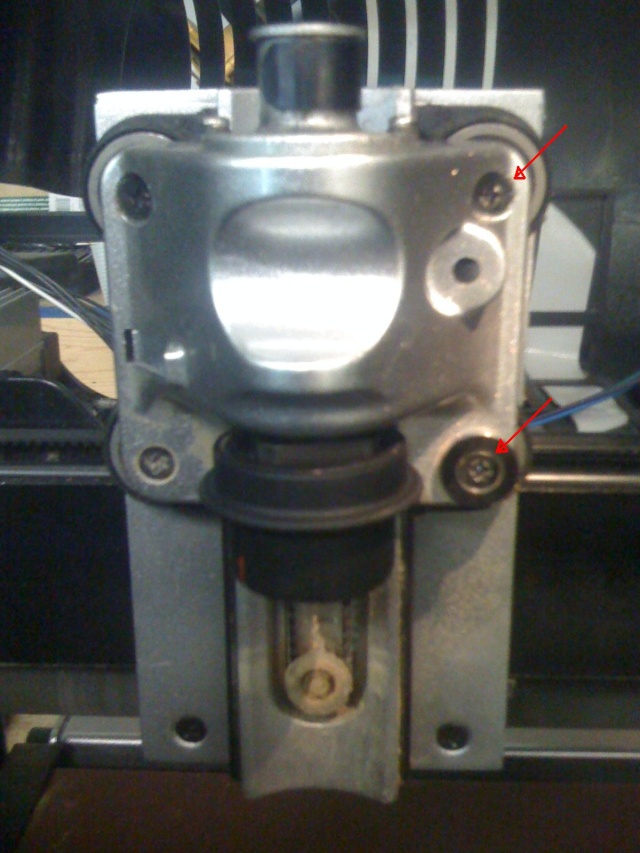
There was a note about these in the guide that said that if they could not be turned that you should drill them out as they may be cemented in.... permanently. I tried the hair dryer trick thinking it may just be LockTite, but no.... those screws are in there forever. Not trusting my screw drilling skills, nor my ability to replace them, and considering the fact that I don't have a "Tap and Die" set handy anymore I had to figure out another way.
The manual also stated that the 2 nuts on the backside could be turned with a 12mm wrench, the only problem is that the wrench needs to be about 1/4 the thickness of a regular wrench to fit between all the parts. If you find one that fits in there do me two favors, let me know where you got it, and keep a hold of the one you have! Well the two options that the company gives are out, time to pull some MacGyver Magic out of the hat.
I noticed that the manual said that the 2 rails the Z Pack "floats" on are free floating. I started looking at how they were held in place and figured that if I drilled the top of the aluminum housing for the rail on the right side that I could push it out and not do too much damage to the housing.
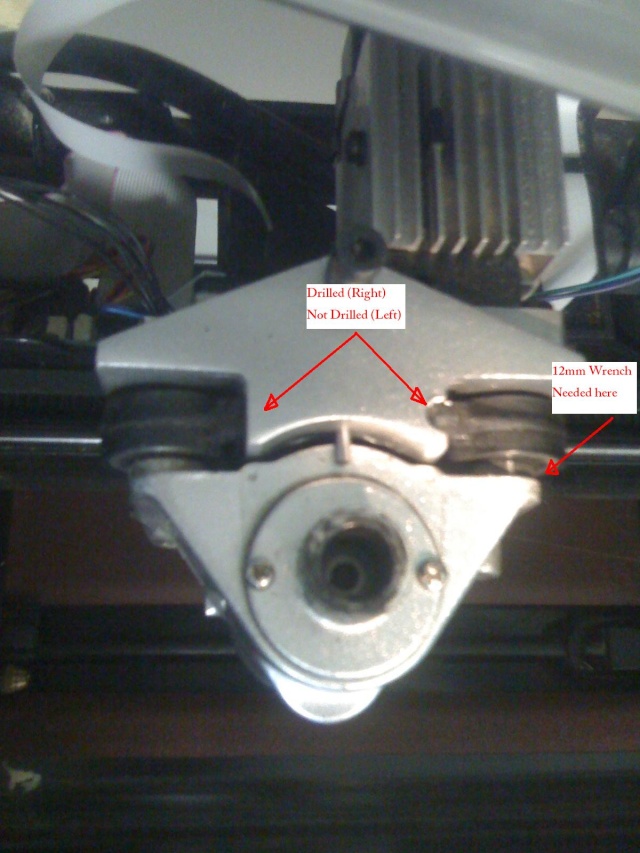
Drilling was fairly easy, I made sure to tape off the area to prevent filings from contaminating the rest of the machine. After I drilled to the top of the rail, a few light taps to the bottom of the rail and it popped right out.

After removing the entire assembly I found my culprit: 2 friggin small screws, the two screws that hold the Z Pack to the belt had worked themselves loose. One had disappeared entirely, and the other was holding on by two threads.
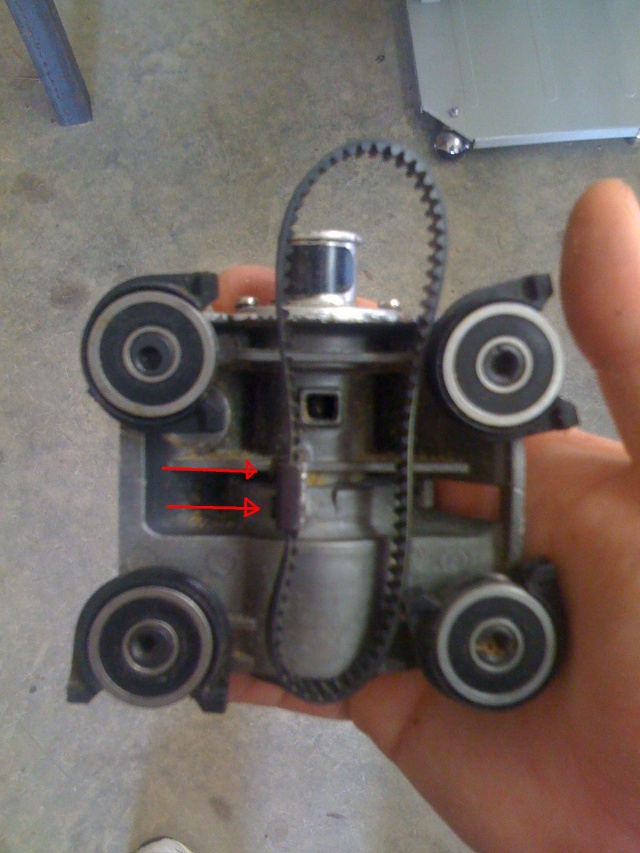
I added some BLUE LockTite and replaced the old screws. I used the BLUE LockTite instead of the RED so that I could still remove the screws in the future if needed.

I have put a couple of more hours on the machine and have not had a problem yet. I am hoping that this works.... will post updates and let you all know how it goes.
I purchased the CW and carved 1 test item.... just to see the machine work. Something small, no big deal.
After playing with the software and getting a design that I really liked, I got everything loaded up into the machine a proceeded to carve. During this carve I received one "Z Axis stall" error message. I reset the job (about 25% complete) and restarted the machine. No more problems...
My 3rd carve was to be the same item as before, I wanted to see design repeatability on different types of wood, the first piece was pine, this was to be red oak. I got everything loaded up and started the carve. This time all hell broke loose: The machine jammed the bit to the hilt into the wood, almost dead center of the piece, and started cutting at darn near warp speed (through 1.5 inch red oak) along the Y axis. The bit broke and smoke was coming from the machine. I cleaned everything up, let her cool, checked the design again, got another piece of wood and started over again.
This time it was error after error, all of them Z Axis stall. So I closed up shop for a while. I never got around to sending it in for warranty repair, life has a way of distracting you sometimes. So here I am, brand new workshop $2k on a machine, its out of warranty, and broke... time to break out the duct tape.
I found the manual on the CW site on how to remove the "Z Pack" and followed the instructions. I figured the best place to start was there since it was the culprit for all the errors. As I started to work, I found that I could not turn the 2 cammed screws.
There was a note about these in the guide that said that if they could not be turned that you should drill them out as they may be cemented in.... permanently. I tried the hair dryer trick thinking it may just be LockTite, but no.... those screws are in there forever. Not trusting my screw drilling skills, nor my ability to replace them, and considering the fact that I don't have a "Tap and Die" set handy anymore I had to figure out another way.
The manual also stated that the 2 nuts on the backside could be turned with a 12mm wrench, the only problem is that the wrench needs to be about 1/4 the thickness of a regular wrench to fit between all the parts. If you find one that fits in there do me two favors, let me know where you got it, and keep a hold of the one you have! Well the two options that the company gives are out, time to pull some MacGyver Magic out of the hat.
I noticed that the manual said that the 2 rails the Z Pack "floats" on are free floating. I started looking at how they were held in place and figured that if I drilled the top of the aluminum housing for the rail on the right side that I could push it out and not do too much damage to the housing.
Drilling was fairly easy, I made sure to tape off the area to prevent filings from contaminating the rest of the machine. After I drilled to the top of the rail, a few light taps to the bottom of the rail and it popped right out.
After removing the entire assembly I found my culprit: 2 friggin small screws, the two screws that hold the Z Pack to the belt had worked themselves loose. One had disappeared entirely, and the other was holding on by two threads.
I added some BLUE LockTite and replaced the old screws. I used the BLUE LockTite instead of the RED so that I could still remove the screws in the future if needed.
I have put a couple of more hours on the machine and have not had a problem yet. I am hoping that this works.... will post updates and let you all know how it goes.


 Wed Feb 04, 2015 4:02 pm by Ken Schwendinger